HALO IN 60: Configuring Purchase Orders in HaloITSM, in three parts
Configuration > Purchase Orders is one screen in five sections: Purchase Order Settings, Ready For Purchasing, PDF Templates, Approval Settings and Advanced. We recorded the whole screen. It has 44 controls: 40 settings and four buttons. That is too much for one carousel, so this episode comes in three parts. Part 1 covers numbering, items, delivery and sending. Part 2 covers receiving, attachments, lines, currency and PDFs. Part 3 covers approvals. The first two parts have ten settings each and the third has nine, picked as the ones we would check first, and the prose underneath picks up the next tier. Where a card covers a group of fields that belong together, such as the three prefixes or the CC and BCC addresses, we count the group as one setting. Where we say a setting is ticked here, we mean on Hikon’s own instance, not that it is the right choice for yours. Two vendor documents are quoted. The process guide is Halo guide 1991, and the admin reference is the field table in Halo guide 1457.
Part 1 of 3: PO setup
These settings decide how a purchase order is numbered, what can go on it, where its goods are delivered and how it leaves Halo.
Numbering and items

1. Use the Purchase Order ID to generate the Reference Number
Unticked here. The screen says that otherwise the ticket and sales order ID are used if applicable. Ticked, the admin reference says the ID of the purchase order itself, for example 01-1, becomes the Reference shown in the pinned sidebar on the right of the PO, and the respective prefix still applies when one is set.
2. Prefix for POs created from a Ticket, a Sales Order and standalone POs
R, O and P here, in that order for ticket, sales order and standalone POs. When a PO is created from one of those starting points, its ID is prefixed with what is entered in the matching field. The prefix still applies when the PO ID is used for the Reference Number.
3. Restrict Items added to POs to the Items against the Supplier
Ticked here. The items shown in the add list are restricted to those available from the supplier selected on the PO. Unticked, all items can be selected, whichever supplier they come from. The process guide says a default supplier can be set for each product, and that supplier is used when a PO is raised for that item.
4. Add a note to the Ticket when PO items are brought into stock
Unticked here. Ticked, a PO linked to a ticket, usually an Opportunity, adds a note to that ticket when items on the PO are brought into stock. The admin reference also lists Linked Ticket Status when PO items are brought into stock, which sets the ticket to a chosen status as well. That setting did not render on this screen.
Delivery

5. Delivery Default
Deliver to the User here. It is the one field in this section marked as required, with an asterisk. It chooses who a purchase order is set to be delivered to by default, and the address against the entity selected becomes the default delivery address. The process guide describes a default as a checkbox called Deliver to the User by default, where the screen has this dropdown, so this article follows the screen. The process guide also says that when an order is delivered to the user, the address of the site assigned to the sales order is used as the PO’s delivery address.
6. Use the Organisation of the Assigned Agent for ‘Deliver to us’
Unticked here. The admin reference says that, ticked, each time a PO is set to Deliver to us the address for the organisation of the assigned agent is used, and that unticked it uses the address of the customer the sales order associated with the PO is for. It adds that setting the PO to deliver to user uses the customer’s address whatever this setting says. The process guide says something different for Deliver to us: that your organisation’s address is used as the PO’s delivery address. The two documents do not agree, the helper text on screen is worded awkwardly, and the recording cannot settle it, so test a PO on your own instance before you rely on either.
7. Prevent receiving more stock than the purchase order line quantity
Ticked here. If a product line on the PO has quantity 5, you cannot receive more than 5. The admin reference says this affects the quantity check for all delivery methods, such as end-user and to us. The process guide separates the two routes: Consign Items is available on the PO only when the order is delivered direct to the user, and Receive Stock only when it is not.
Also in this section. Item Code for Miscellaneous Items for POs is empty here. The product chosen supplies the product code used when ad-hoc products are added to a PO, and the screen says its Purchases Accounts Code is the Purchase Account Code used. Currency symbol for Purchase Orders is empty. If unset it is inherited from the server’s regional settings, and a space before the symbol displays it as a suffix. Allow consignment of existing Assets when delivery it set to ‘Deliver to the User’ is the screen’s own spelling of that label. It is unticked, and the admin reference says that, ticked, existing unlinked assets can be consigned when delivery is to the user. Cost Centres is a button that opens the menu for creating and configuring cost centres, which are entities with associated addresses that can be used to group costs.
Sending and syncing

8. From Address
*Not set* here. It determines the mailbox that Purchase Orders are sent from. The process guide says that when you send a PO, the To address on the email is filled from the email address stored against the supplier record.
9. Purchase Order CC address and BCC address
Both empty here. Email addresses entered in the CC field become the default CC address for the sending of all purchase orders, and addresses entered in the BCC field become the default BCC address in the same way.
10. Only sync Purchase Orders to 3rd party integrations on certain statuses
Unticked here. Ticked, a checkbox shows against each status, letting you choose which statuses allow the PO to sync to your third-party integration. The screen says you can select the statuses in status config, and the process guide puts the status list under Configuration > Purchase Orders > Purchase Order Statuses. The admin reference says that from v2.253+ this setting is deprecated and replaced by Only sync selected entities to 3rd party integrations on certain statuses, with a matching setting for tax integrations, which is useful when you would not like purchase orders synced to your accounting tool while they are in a draft or editing status. Neither replacement rendered on this screen, and the recording does not show the version, so we cannot say which applies here.
Statuses. Purchase Order Statuses is a button that opens the menu for creating and configuring PO statuses, which can be set to disable editing or to mark a PO as closed or sent while it is on them. The process guide recommends leaving the system uses as default, because changing where a system use sits affects how your quotes are closed.
Part 2 of 3: PO handling
These settings cover what happens once goods start to arrive and who can change a PO afterwards, which documents and numbers travel with it, how supplier currency and line descriptions behave, and how the PO is raised from Ready For Purchasing and printed.
Receiving and attachments
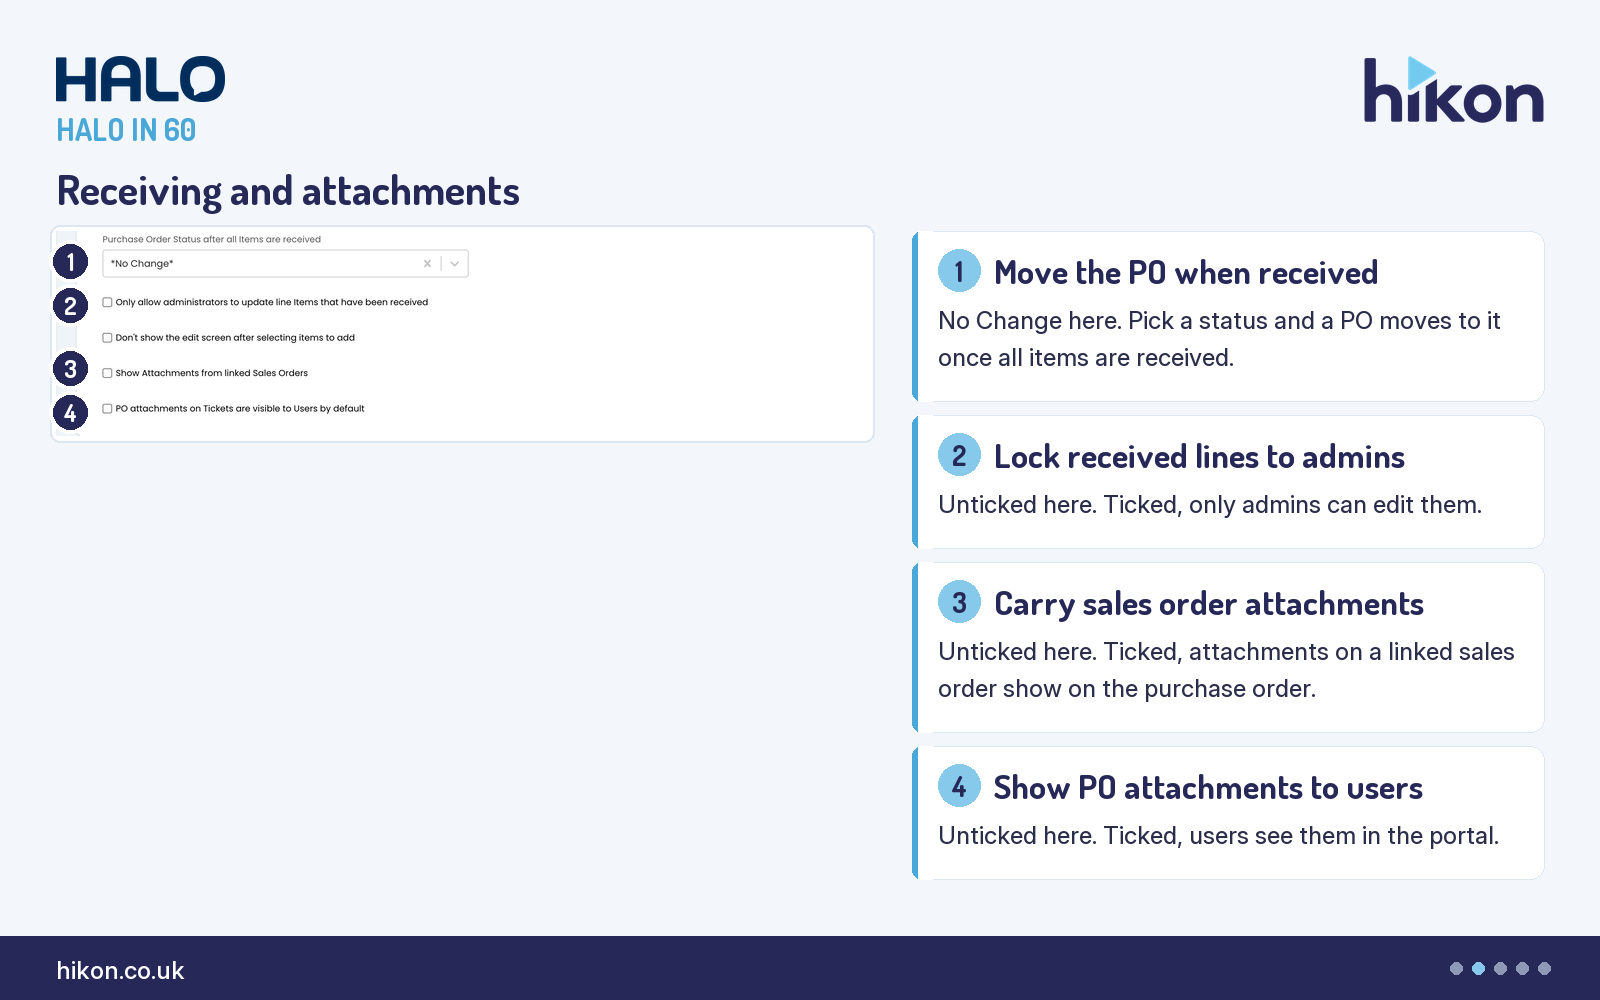
1. Purchase Order Status after all Items are received
*No Change* here. It lets you choose the status a purchase order is moved to automatically once all products are received. The screen says Items where the admin reference says Products, and the headings in this article use the screen’s word.
2. Only allow administrators to update line Items that have been received
Unticked here. Ticked, agents need the administrator role to update purchase order lines for received products. The process guide gives a reason: it lets managers correct product numbers that an agent entered incorrectly.
3. Show Attachments from linked Sales Orders
Unticked here. Ticked, attachments added to the sales order show on the purchase order, provided the sales order is linked, meaning the PO was created off the back of it. The admin reference adds a chain: if Show attachments from linked Quotes, under Configuration > Sales Orders, is on, quote attachments pull through to the sales order and then to the purchase order, when this PO setting and the sales order setting are both enabled.
4. PO attachments on Tickets are visible to Users by default
Unticked here. Ticked, end-users can see the PO attachment on tickets from within the self service portal.
Also in this section. Don’t show the edit screen after selecting items to add is unticked. Ticked, the edit screen for individual line items does not pop up when you add items to purchase orders. If you do not track stock levels, the process guide says Configuration > Items and Stock Control then shows Allow Purchase Order stock to be received when not tracking stock, which can be enabled so you can still record that stock has arrived from suppliers.
Lines and currency
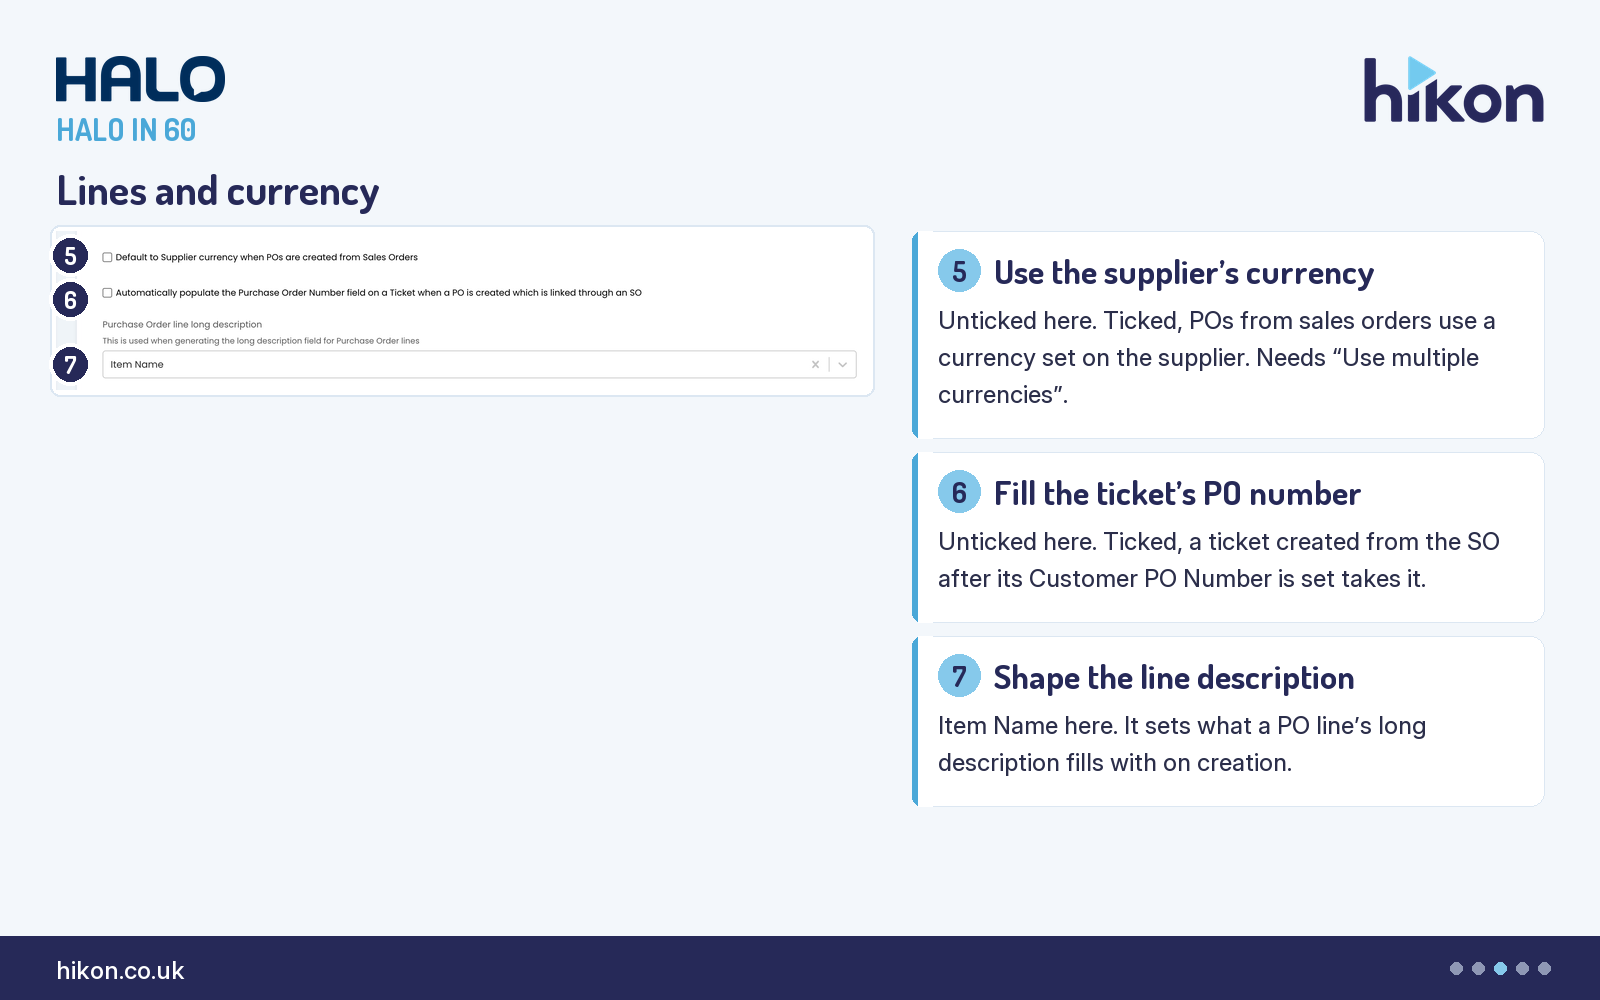
5. Default to Supplier currency when POs are created from Sales Orders
Unticked here. The admin reference gives a prerequisite: you must first enable Use multiple currencies under Configuration > Billing > General Settings. You can then set a currency against a supplier, in the settings tab of the supplier. With this setting ticked and a currency set on the supplier, a PO created from a sales order uses the supplier’s currency instead of the one on the sales order. In the Halo agent app you still see the native currency, but the PDF sent to the supplier carries the supplier’s currency.
6. Automatically populate the Purchase Order Number field on a Ticket when a PO is created which is linked through an SO
Unticked here. Ticked, the Purchase Order Number field on the ticket, found on its Billing tab, fills with the Customer PO Number held on the linked sales order. For this to work, the ticket must be created from the sales order after Customer PO Number is populated, and the process guide says the field will not update after the ticket has been created. The process guide says the field exists because purchase orders cannot be raised from a ticket directly.
7. Purchase Order line long description
Item Name here. The admin reference, which carries a v2.244+ note, says this determines what the long description of a PO line fills with when the line is created. It can use the product name, the product purchase description, or be customised with variables. A further field for the variables appears only when Use variables is chosen, so it does not show with Item Name selected.
Purchasing and PDFs

8. Group purchase orders based on Ticket ID set on the sales order
Unticked here. The setting sits under Ready For Purchasing. Ticked, you can checkbox sales orders that are linked to the same ticket ID.
9. Default PDF Template for POs
Default PO Print Template here. It determines the default PDF template used when Purchase Orders are created. The Edit PO Pdf Templates button beneath it opens the menu for creating and configuring PO PDF templates, which are fully customisable with custom HTML. The process guide’s SKU example works in the PDF templates area under Configuration > Reporting: the SKU on a PO line is taken from the Default Manufacturer SKU on the item, a supplier-specific SKU comes from an entry in the item’s overriding cost and price table, and extra SKUs on the PDF need a custom column in the template that holds the relevant variable.
10. Number of decimal places for billing entity values on PDFs
5 here. This control is on the screen but not in the admin reference’s field table, so the label is all we can tell you about it: it sets the number of decimal places for billing entity values on PDFs.
Also in this section. Show override Supplier option is unticked. It is on the screen but not in the admin reference’s field table, and that table lists a setting with a related name, Show sales order lines with no Supplier set, which did not render, so we have not assumed they are the same.
Part 3 of 3: PO approvals
The Approval Settings section is nine controls. The process guide says purchase order approvals can be used to prevent POs from being sent to suppliers until they have been approved by a selected agent, and that enabling approvals makes additional configuration options appear. The first three cards below cover switching approvals on and what agents can do before approval. The next three cover approved POs, ticket approval and syncing. The last three cover the minimum cost, the approver and auto-approval. The Advanced section follows in a note at the end.
Switching approvals on

1. Enable approval processes on Purchase Orders
Ticked here. When checked, approval processes can be set to be required for purchase orders to be completed. The process guide says that once this is enabled, additional configuration options appear.
2. Allow generation of PDF before approval
Ticked here. The process guide says that, when enabled, agents can generate a PDF of the PO before it has been approved. The admin reference adds that they will also be able to receive stock for the items on the PO, and that when this is unticked those actions are restricted until the PO is approved. Allow stock processing before approval is a separate setting, next, and neither document says how the two combine, so test both together before you rely on either.
3. Allow stock processing before approval
Unticked here. Ticked, stock can be used before the purchase order has been fully approved.
Approval rules

4. Allow Items to be added to Approved Purchase Orders
Unticked here. Ticked, products can be added to purchase orders that have already been approved, and the screen says the approval restarts when items are added. When it is unticked, the admin reference says admin agents can still add new lines to the PO, but no items can be added to approved POs when ordering items from a sales order.
5. Use Opportunity/Ticket approval rather than simple approval for Purchase Order approvals
Unticked here. Ticked, opportunity or ticket approvals can be used to approve the PO instead of simple agent approval. The PO must be linked to a ticket or opportunity, and once the approval process begins, the approval steps are visible in that ticket. The process guide says this lets you use set CABs or a multi-stage approval process, and that agents can approve from the My approvals module or from within the ticket, but cannot accept or reject the PO against the PO itself, which they can with simple approval.
6. Purchase Orders must be approved before syncing to a third-party billing integration
Unticked here. Ticked, purchase orders are not sent to third-party billing integrations unless they have been approved first.
Who approves and when

7. Minimum PO Cost to require approval
0 here. The screen says this value can be overridden per agent, and that purchase orders with a total cost less than the value still need to be marked as approved, but any agent can action this and approval will be guaranteed. The admin reference and the process guide both describe it differently: a PO must exceed the value to require approval, and the admin reference adds that below it the PO is approved automatically. Where the screen and the documents differ, this article follows the screen, and on a live instance it is worth testing with one PO below the value and one above it.
8. Approver Selection
The control shows Enter an email address here. The process guide says the choice decides how the agent selects who needs to approve the PO: they can enter an email address or select from a list of agents, and if fixed email address is chosen you can enter the email address of the person who approves all POs. The process guide adds that agents who can approve POs are the ones with Can approve purchase orders set on their agent profile.
9. Auto-approve Purchase Orders if created by an approver
Unticked here. Ticked, the approval goes through for a purchase order if the agent creating it is an approver. The process guide adds a v2.251+ permission, Can self approve on billing entity approval processes, which controls whether an approver’s own requests approve automatically, and says even an administrator needs it. It does not say whether the permission replaces this setting, so check both. With ticket approval, the process guide says auto-approval is decided by the approval process chosen.
How simple approval runs. The process guide describes the simple route: the approver replies APPROVE or REJECT to the approval email, or uses Accept and Reject on the PO in the agent app, and the email is hard-coded to the Approval of PO Message template. Once accepted, the Send button appears and, the process guide says, no further items can be added from sales orders. The same guide says that with Allow Items to be added to Approved Purchase Orders ticked, additional items can be added from sales orders after approval, so treat that setting as the exception. At any point the approval can be restarted from the PO.
Advanced. Allow editing of third party order number is unticked. Ticked, you can edit the third-party order number related to the Halo PO, and the screen and the admin reference agree that this only works with the Xero billing integration. Purchase Order Default Column Profile and Purchase Order Lines Default Column Profile are both *Default*. The screen says the first can be overridden per agent in the agent preferences, and Configure Column Profiles is a button in the same section. None of those three controls is in the admin reference’s field table.
What the process guide adds
The process guide covers some topics that are outside this screen. Sending is shown in the Change History tab on the PO, and the process guide says this will only show if the PO is raised separately from an opportunity ticket, because of the way the email is stored. Supplier receipt confirmation uses the variable $-LINKTOCONFIRMPURCHASEORDERRECEIPT in the email to the supplier, which generates a link the supplier can click to confirm receipt; the process guide shows a report that lists confirmation status. Screen layout profiles for purchase orders, from v2.240+, customise tab order and system field visibility, and are set under Configuration > Advanced Settings > Screen Layouts. Purchase currency is for tracking costs when you buy in a currency other than your own while measuring everything in your default currency.
Points to check
The first is that approvals involve several settings. Enabling approvals, how the approver is selected, which agents have Can approve purchase orders, whether a minimum cost applies, and whether approvers’ own POs approve themselves are each separate controls. On this instance approvals are enabled, the approver control shows Enter an email address, the minimum cost is 0 and auto-approve is unticked.
The second is the minimum cost. The screen says a PO below the value still needs marking approved, by any agent, while both vendor documents describe a PO below the value as not needing approval. Settle it with a test PO on your own instance before you build a process around the threshold.
The third is the overlap between PDFs, stock and approval. The admin reference says allowing a PDF before approval also lets agents receive stock, and a separate setting covers stock processing before approval. Neither document describes how they interact, so decide the pair together.
The fourth is terminology. The documents and the screen do not always agree. The screen says Items where the admin reference says Products. The process guide describes Deliver to the User by default as a checkbox where the screen has a Delivery Default dropdown. Several settings and features carry vendor version notes, such as v2.244+, v2.253+ and v2.251+, and the recording does not show the instance version. Every heading in this article follows the screen.
More HALO IN 60 guides
This episode is part of an ongoing series covering one HaloITSM configuration screen at a time. Related episodes: Chat, Knowledge, Time Management, Notifications, Appointments, Reporting, Asset Management, Service Level Agreements, Self Service Portal, Tickets, PII Data Flagging, Users, Email.
Need a hand?
Hikon configures HaloITSM for organisations that would rather it worked properly the first time. If you want a second pair of eyes on your Purchase Orders configuration, see what we do with Halo.
Vendor reference: Halo — Purchase Orders, with settings detail from its linked admin reference, Purchase Orders, guide 1457. Screens were captured from a live instance; where the vendor documents and the interface differ, this article follows the interface.
Enjoying this?
Talk it through with the people who wrote it — a free 20-minute call, no pitch.
Let's talk →