HALO IN 60: Configuring Time Management in HaloITSM
The Time Management screen is where HaloITSM decides whether the hours your agents actually work become hours you can actually invoice. It is one of the few configuration areas that touches auditing, scheduling, timesheets and billing at once, and it is one of the easiest to leave on its defaults for a year without noticing. This is an episode of HALO IN 60, our series that takes one configuration screen at a time, and it covers nine settings in the order they appear on screen.
Capturing time
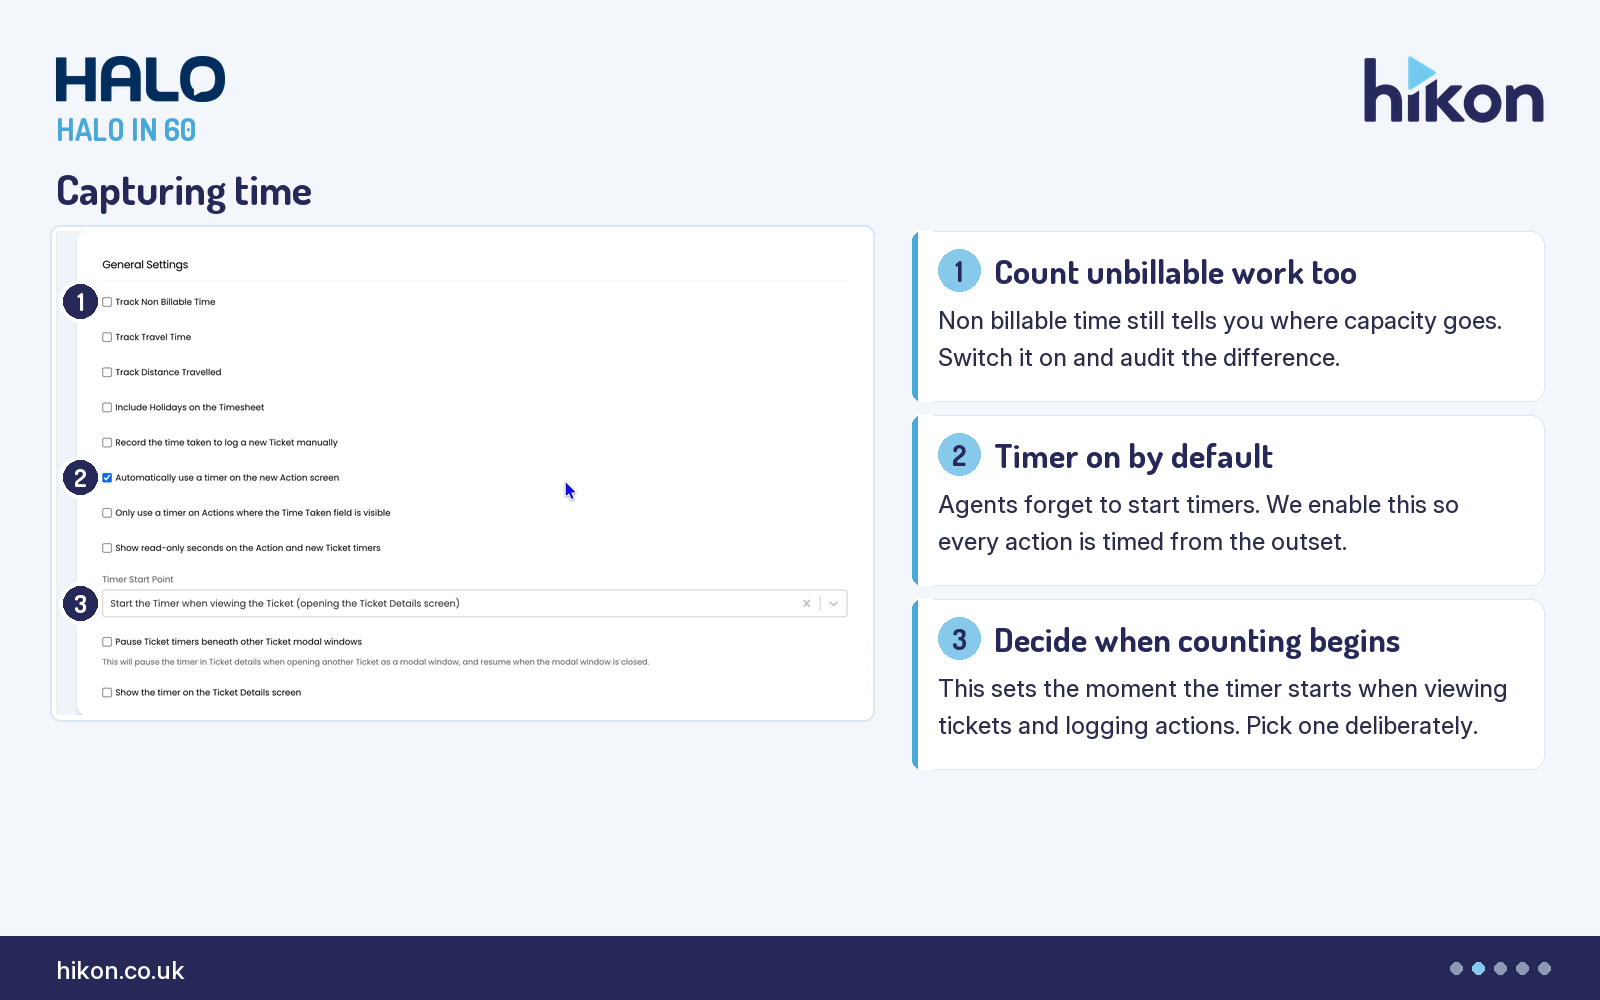
1. Track Non Billable Time
When this is checked, time logged against a ticket that is not billable is still recorded and kept for auditing purposes. Teams often leave it off because it does not affect an invoice, which is exactly why it is worth turning on. Non billable effort is the part of your capacity nobody can see until you measure it.
2. Automatically use a timer on the new Action screen
With this checked, the timer function is enabled automatically whenever an agent logs an action, rather than waiting to be started by hand. Agents forget, and time recalled at the end of the day is time estimated rather than measured. If you want your action time to reflect reality, this is the switch that gets you there. Its companion, "Only use a timer on Actions where the Time Taken field is visible", narrows the timer to actions that genuinely record time.
3. Timer Start Point
This single select determines the point at which the timer begins counting when viewing tickets and logging actions. It is a small dropdown with a large effect on your numbers, because it decides whether reading a ticket counts as working on it. Pick it deliberately and make sure everyone knows which behaviour is in force.
Timesheets
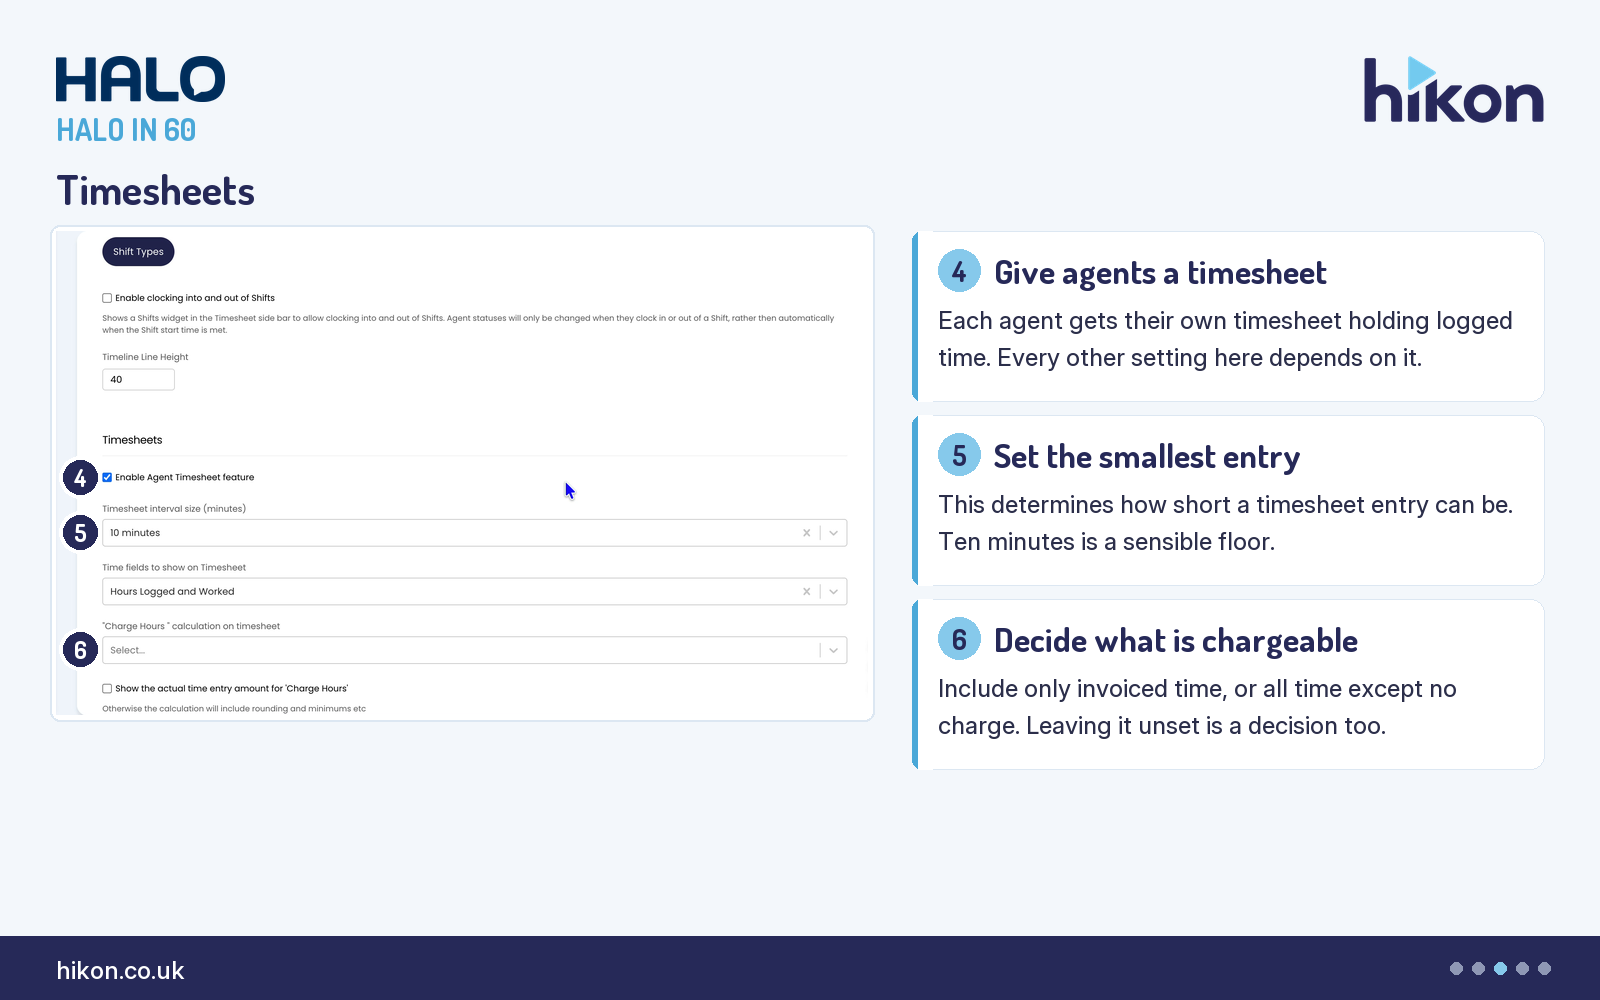
4. Enable Agent Timesheet feature
Checking this gives agents their own individual timesheets, where their logged time is displayed. It is the foundation of the whole section: interval size, charge hours, approvals and incomplete-timesheet notifications all sit underneath it. Turn it on before you attempt to configure anything else here.
5. Timesheet interval size (minutes)
This determines how short a timesheet entry can be. Set it too fine and you invite false precision that nobody sustains, set it too coarse and short pieces of work round up into money you did not earn. Ten minutes is a sensible floor for most service desks, and the recorded instance uses exactly that.
6. "Charge Hours" calculation on timesheet
This decides which time counts towards charge hours: include only time that will be invoiced, or include all time except no charge. On the recorded instance it is unset, and that is worth noticing, because an unset choice here still determines what your timesheet totals mean. Its companion, "Show the actual time entry amount for 'Charge Hours'", decides whether the figure shown is the raw time taken or the one that has been through rounding and minimums.
Logging time
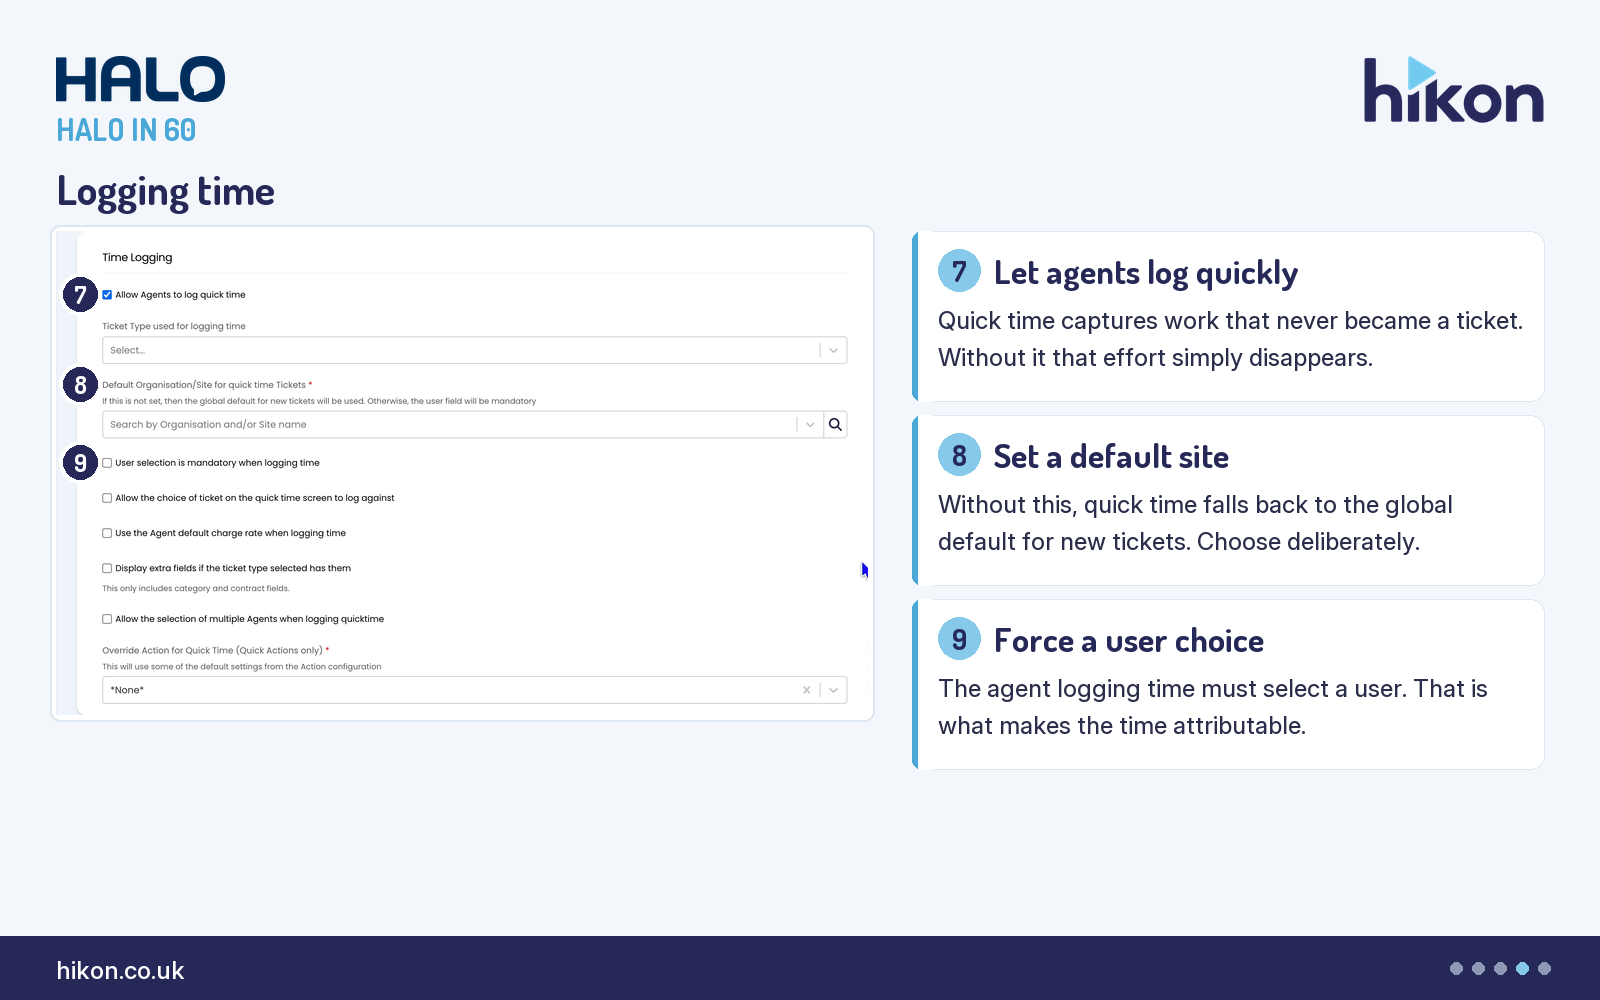
7. Allow Agents to log quick time
This makes the ability to log time available to agents. Quick time is the safety net for the corridor conversation, the five minute fix and the phone call that solved something without a ticket ever existing. Without it, that effort simply never appears in your numbers. Note that the vendor guide calls this setting "Allow Agents to log time", while the interface says "quick time".
8. Default Organisation/Site for quick time Tickets
The site chosen here is used as the default selection when quick time tickets are logged. The interface is explicit about the consequence of leaving it unset: the global default for new tickets is used instead. Choose it deliberately rather than inheriting a default you have never looked at. The guide refers to this field as "Default Customer/Site"; the interface says "Organisation/Site".
9. User selection is mandatory when logging time
With this checked, the agent logging time must select a user to log that time against. It is the difference between time you can attribute and time that merely exists. If quick time is going to inform capacity planning or billing, attribution is not optional.
Where teams get this wrong
The setting most often left alone is "Enable Timesheet Approvals". Checked, timesheets must be submitted and approved rather than simply filled in, which is what turns a timesheet from a record into a control. It earns its place next to "Actions cannot be invoiced until Timesheets are approved" if you want approval to genuinely gate billing, and next to "Send Timesheet rejection emails" so a rejection reaches the agent rather than sitting unseen. On the instance recorded here it is off, along with everything that depends on it.
The most common mistake is configuring this screen in the wrong order. Several settings only appear once their parent is enabled: "Include Travel Time in Actions on the Timesheet" is invisible until "Track Travel Time" is checked, and the approval controls that actually matter, including "Actions cannot be amended once Timesheets are submitted" and "Actions cannot be invoiced until Timesheets are approved", only surface once approvals are switched on. Configure the parents first, then revisit the screen, or you will conclude that settings the documentation describes do not exist in your instance.
The second mistake is treating Shifts as a checkbox rather than a sequence. "Enable Shifts" replaces workdays with shift appointment types for agents with shifts enabled, but on its own it does very little. The value comes from defining the values in "Shift Types", deciding whether recurring team-level shifts are needed through "Enable Team Shifts", and choosing whether agents clock themselves in and out. That last option matters more than it looks, because it changes when agent statuses update: on the clock in or out rather than automatically at the shift start time.
Third, watch for version-gated and instance-specific differences. The guide documents "Round time taken to the nearest second" as v2.246+, "Pause Ticket timers on inactive tabs" as v2.238+, and "Enable shift functionality for new Agents by default" as v2.244+, none of which appear on the instance recorded here. The reverse also happens: "Calculate Target Hours using Shift hours for Agents using Shifts", "Override Action for Quick Time (Quick Actions only)", "Break Types" and "Timeline Line Height" are all present in the interface and absent from the guide. Configure against the screen in front of you, not the page you read.
Finally, remember that "Enable action sub-event time entry" is mutually exclusive with the timer. It replaces duration fields with start and end dates, and the timer functionality on the Action screen cannot be used alongside it. Choosing it undoes most of what settings two and three were for, so it is a decision about how your team works rather than a preference to toggle.
Need a hand?
Hikon configures HaloITSM for organisations that would rather it worked properly the first time. If you want a second pair of eyes on your Time Management configuration, see our Halo services.
Vendor reference: Halo guide: Time Management. Screens were captured from a live instance; where the guide and the interface differ, this article follows the interface.
Enjoying this?
Talk it through with the people who wrote it — a free 20-minute call, no pitch.
Let's talk →